Evaluating the Learn Teacher Icons for Real Embroidery Projects
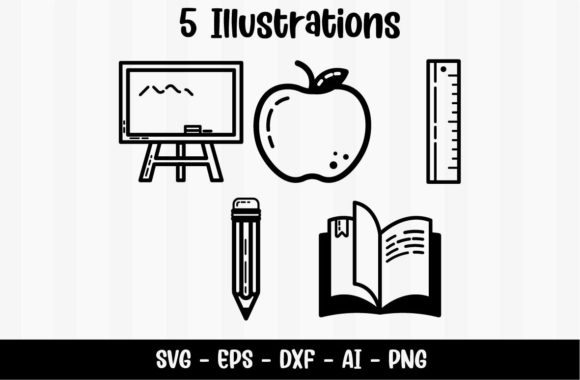
When you work as an embroidery designer for clients or a small business, a design’s appeal isn’t just about how it looks on screen. It’s about how it translates into a tangible product. The Learn Teacher Icons bundle, with its classic teacher-themed graphics, immediately strikes a chord of familiarity and appreciation. My first impression was one of clean, straightforward iconography—a blackboard, apple, ruler, pencil, and book. This isn’t a complex, ornate piece; it’s a set of clear, confident symbols that speak directly to a warm, appreciative mood. The visual personality is friendly and professional, which makes it feel naturally suited for projects meant as heartfelt gifts or branded merchandise for educational themes.
The Perfect Project Match: From Totes to Baby Blankets
Let’s talk about where these icons truly shine. I envisioned a recent client request: a custom embroidered tote bag for a retiring teacher. The clean lines and distinct shapes of these graphics, like the apple or book, are ideal for such a project. On a tote bag’s sturdy fabric, these icons would stitch out with excellent clarity, creating a polished, gift-ready product without overwhelming the material. The same principle applies to a cozy sweatshirt, a crisp apron for a classroom volunteer, or a decorative pillow cover for a teacher’s lounge. The designs are inherently versatile.
For craft businesses and Etsy sellers, this translates well. Imagine a series of embroidered tea towels or a simple, sweet motif on a baby’s blanket for a teacher’s new nursery. The icons carry a universal recognition that boosts their giftability. In a boutique setting, a small, neat rendition of the pencil or ruler on a cap could become a unique piece of merchandise. Because the elements are separate, they offer flexibility—you could use a single icon for a more subtle product or combine a few for a fuller statement.
Where to Exercise a Bit of Caution
Even with high-quality graphics, practical embroidery requires some foresight. The detail level here is balanced, but smaller elements, like the tip of the pencil or corners of the ruler, need attention. If you’re considering a very small hoop size for a delicate project—say, on the cuff of a child’s sleeve or a tiny patch—you must test first. On stretchy or thin fabrics, the stitch density required for a solid fill stitch on the blackboard or apple might need proper stabilizer support to prevent puckering.
Dark fabric backgrounds are another consideration. The provided description notes suitability for printing, but for embroidery, thread color contrast is key. You’d likely want to use bright, contrasting threads on darker garments to maintain the design’s cheerful appeal. Similarly, on curved surfaces like caps, the layout of a larger, combined icon set might need adjustment to ensure the embroidery sits flat and looks cohesive. Always run a test on scrap fabric of the same type and color before committing to the final product.
How These Icons Elevate Your Finished Product
From a business perspective, using a cohesive set like Learn Teacher Icons affects more than just aesthetics. It builds customer trust and enhances your product’s perceived value. A clean, well-stitched teacher icon on a handmade product communicates professionalism and thoughtfulness. For a personalized gift, it feels specific and meaningful, increasing buyer engagement. It supports brand consistency for a shop focused on educational or gift items, allowing you to create a recognizable line of products—from tote bag designs to holiday embroidery gifts.
The design’s clarity directly impacts stitching clarity. Assuming the underlying graphics are clean—which the description suggests—the resulting satin stitches for outlines or fill stitches for solid areas should be sharp. This is crucial for commercial embroidery projects or for digital product sellers creating printable mockups for their listings. A crisp stitch outcome makes the final product look premium, which is essential for craft fairs and Etsy listings where presentation is everything.
Practical Notes from the Embroidery Table
Before you load this embroidery file into your machine, here’s my routine. First, I’d check the actual file formats and licensing terms for commercial use, as the product description doesn’t list them—this is a must for any business application. Then, I’d stitch a sample on both light and dark scrap fabric to judge thread color contrast and see how the details render. Inspecting small areas like the chalk lines on the blackboard or the ruler’s markings in this test run is vital.
Consider the fabric texture for your intended project. A textured linen for a kitchen towel versus a smooth polo shirt for apparel decoration will interact differently with the stitch work. Using proper stabilizer is non-negotiable for maintaining the design’s integrity, especially on garments needing frequent washing. And a simple but powerful tip: create black and white mockups of your planned product. This helps visualize the design’s strength without color, ensuring the shapes themselves carry the message. Whether for a personal project or a craft business product, this due diligence turns a good digital embroidery file into a great finished product.
Ultimately, the Learn Teacher Icons feel like a reliable set of design assets. They tap into a warm, recognizable theme with a practical level of detail that should translate well into stitches. By pairing them with thoughtful project choices and standard embroidery best practices, you can create embroidered patches, custom apparel, and heartfelt gifts that truly resonate. It’s a bundle that understands its purpose, and with a bit of your craftmanship, it can fulfill it beautifully.